
Mr. Max, entertaining me with his rendition of, “You Are My Sunshine”, and making the world a little brighter for me and and the rest of the world.

Mr. Max, entertaining me with his rendition of, “You Are My Sunshine”, and making the world a little brighter for me and and the rest of the world.
and remembering Dad


Though MOST of these delicious blackberries made it to our kitchen, I enjoyed just a FEW on our trip home from Crosswinds, as the evidence on my fingers would attest to. The Mr. was driving…he had to wait!


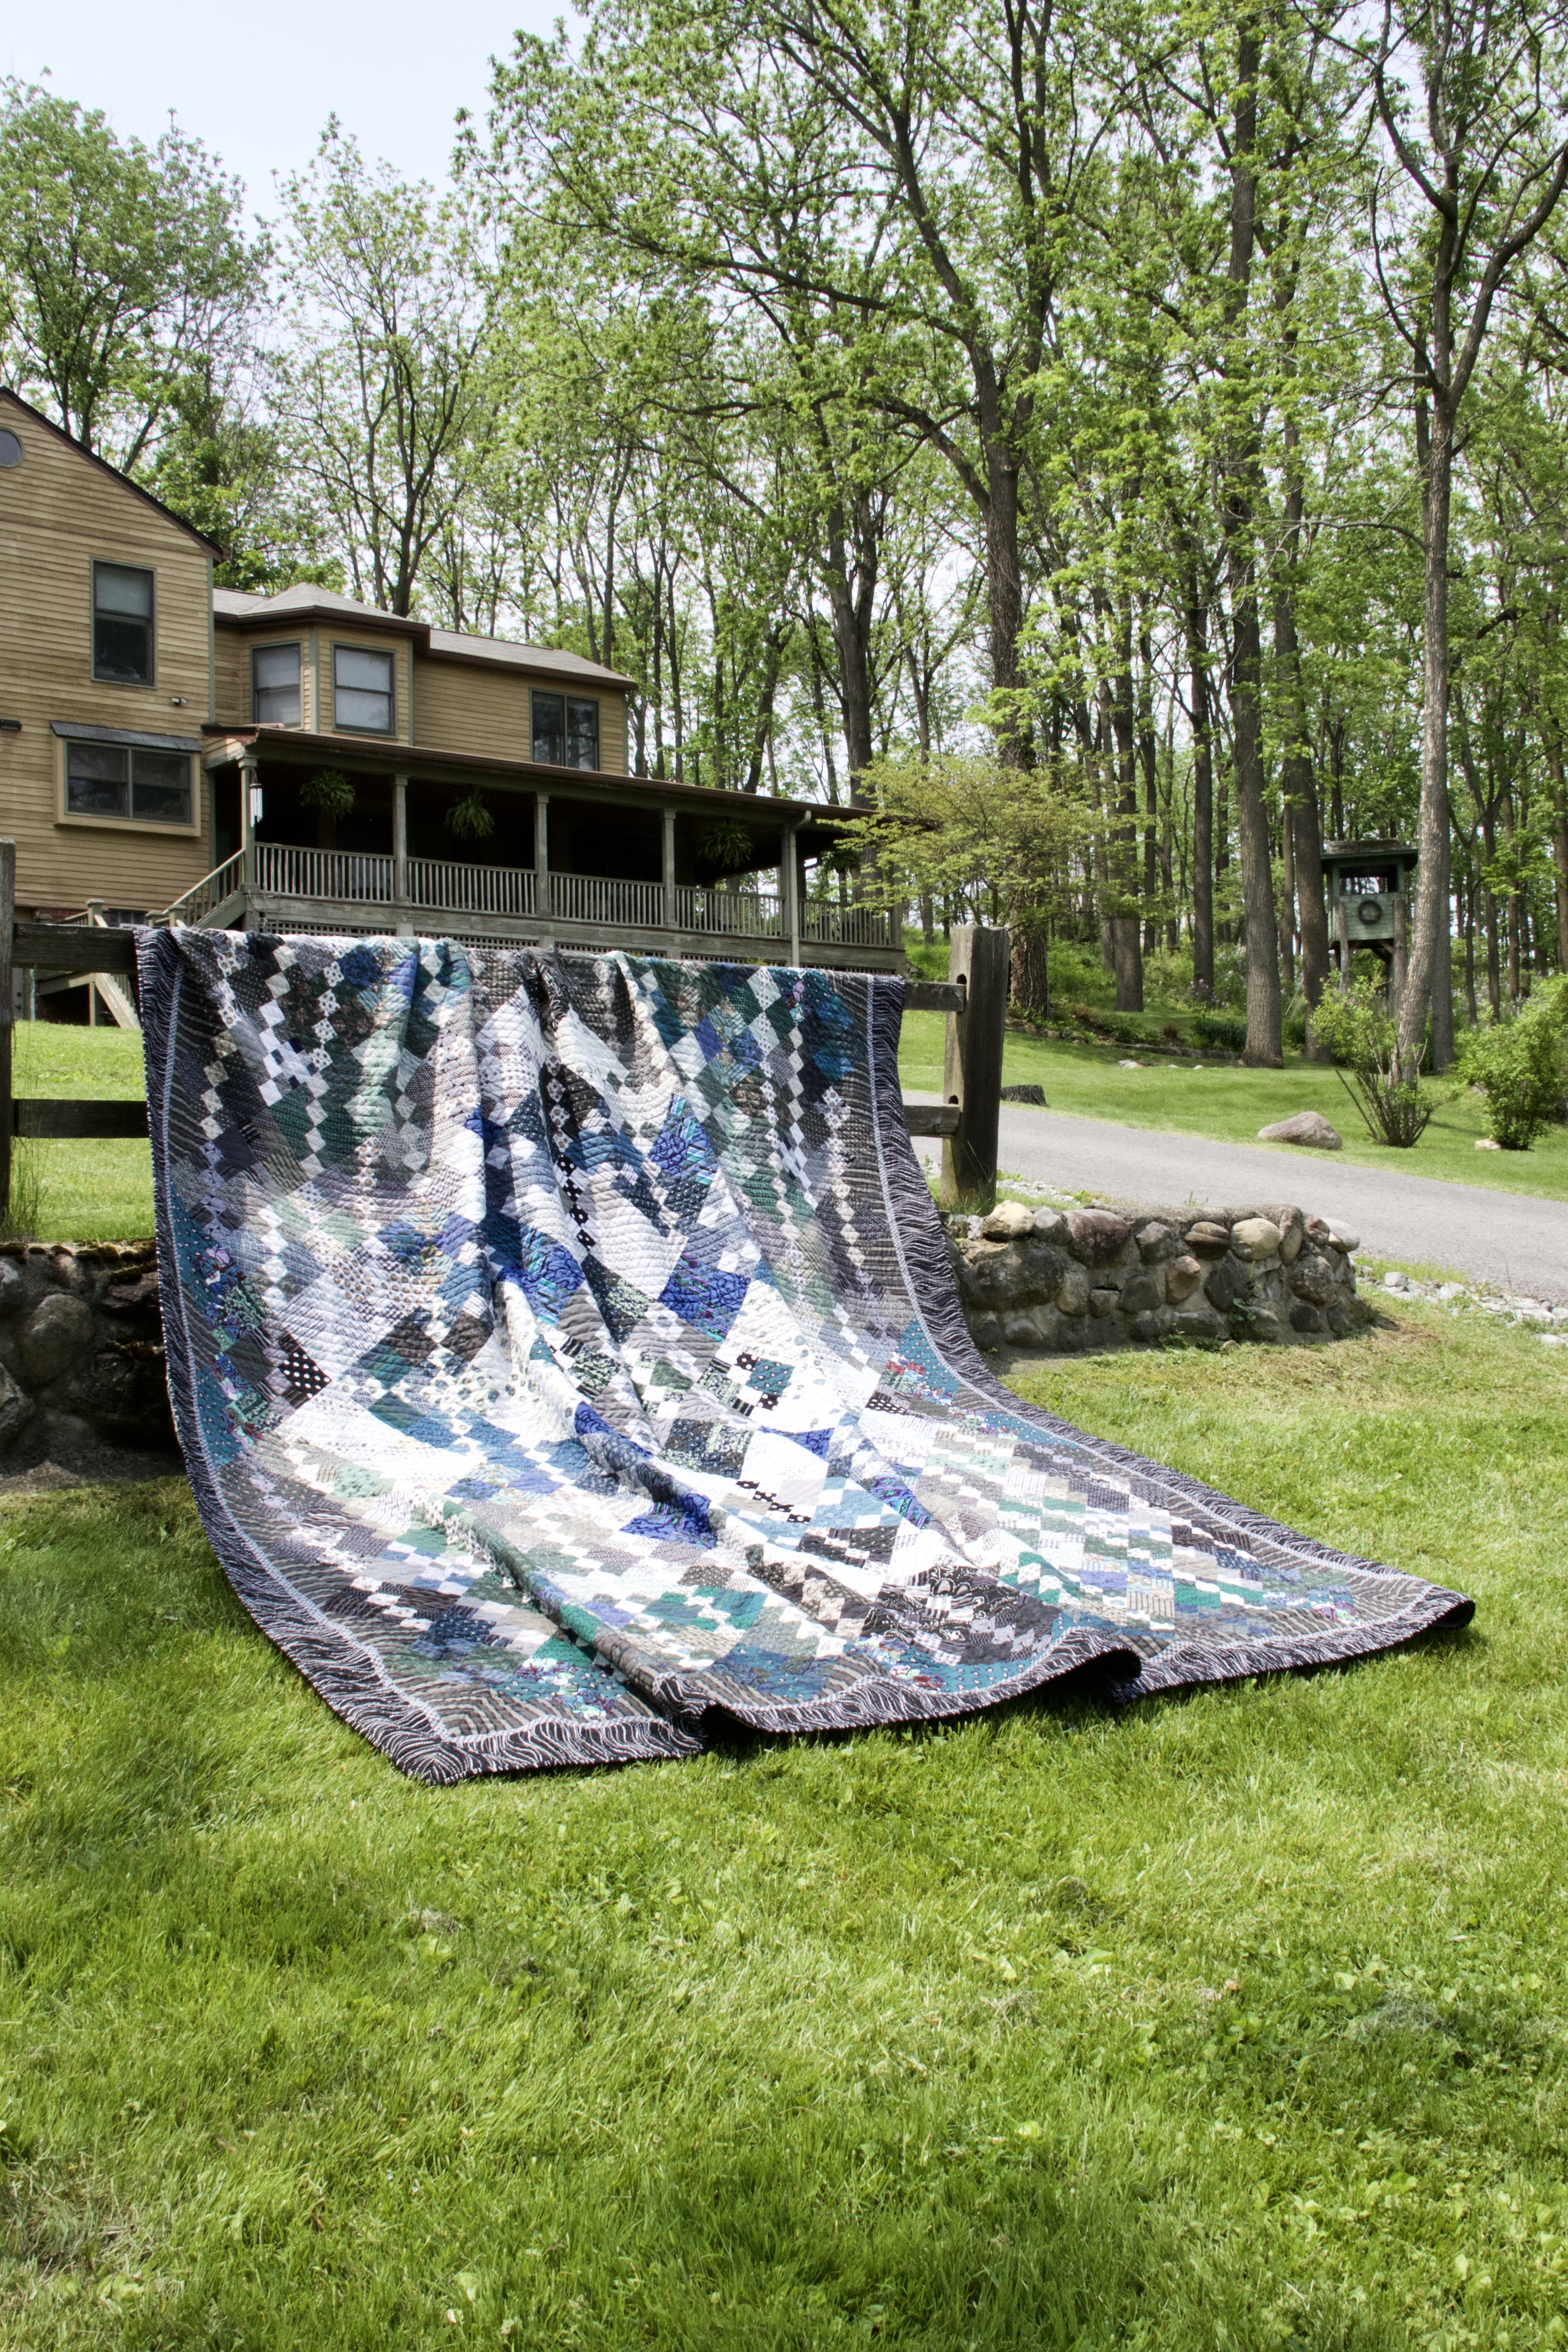 This is our newest quilt and it’s DONE!!! YAY!!! And now for the story of its creation….


Note the date of the Facebook post…YIKES! The year was 2016….and the year the magazine from which the single photo page (no pattern) was torn, was printed in the 1980s. “The End of The Trail” was this antique quilt’s name, which throughout the process of making my king-sized quilt, kept me amused at every juncture when finishing my quilt seemed like it would never come.
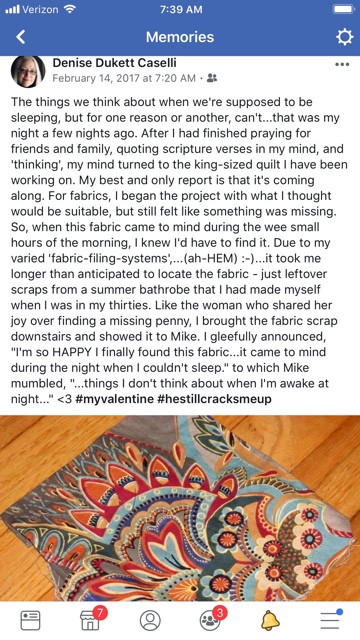
The fabric in the above Facebook post was to be the color wave…I still love it, but none of that fabric ever made it into the quilt. Finally after a disappointing false start with other fabrics that weren’t playing nicely together, I did get started. Using remnants of the ‘family stash’ going back to the 1950s, I used my beloved Singer Featherweight that my dear mother had gifted me in the mid-1970s to do all the piecing…
Piecing the blocks was relatively easy, but finding a place where I could audition the layout was a challenge…our bedroom floor was the only place large enough. My husband, with his long basketball-playing legs, stepped over it a lot on our way to our office. What a good sport he is!


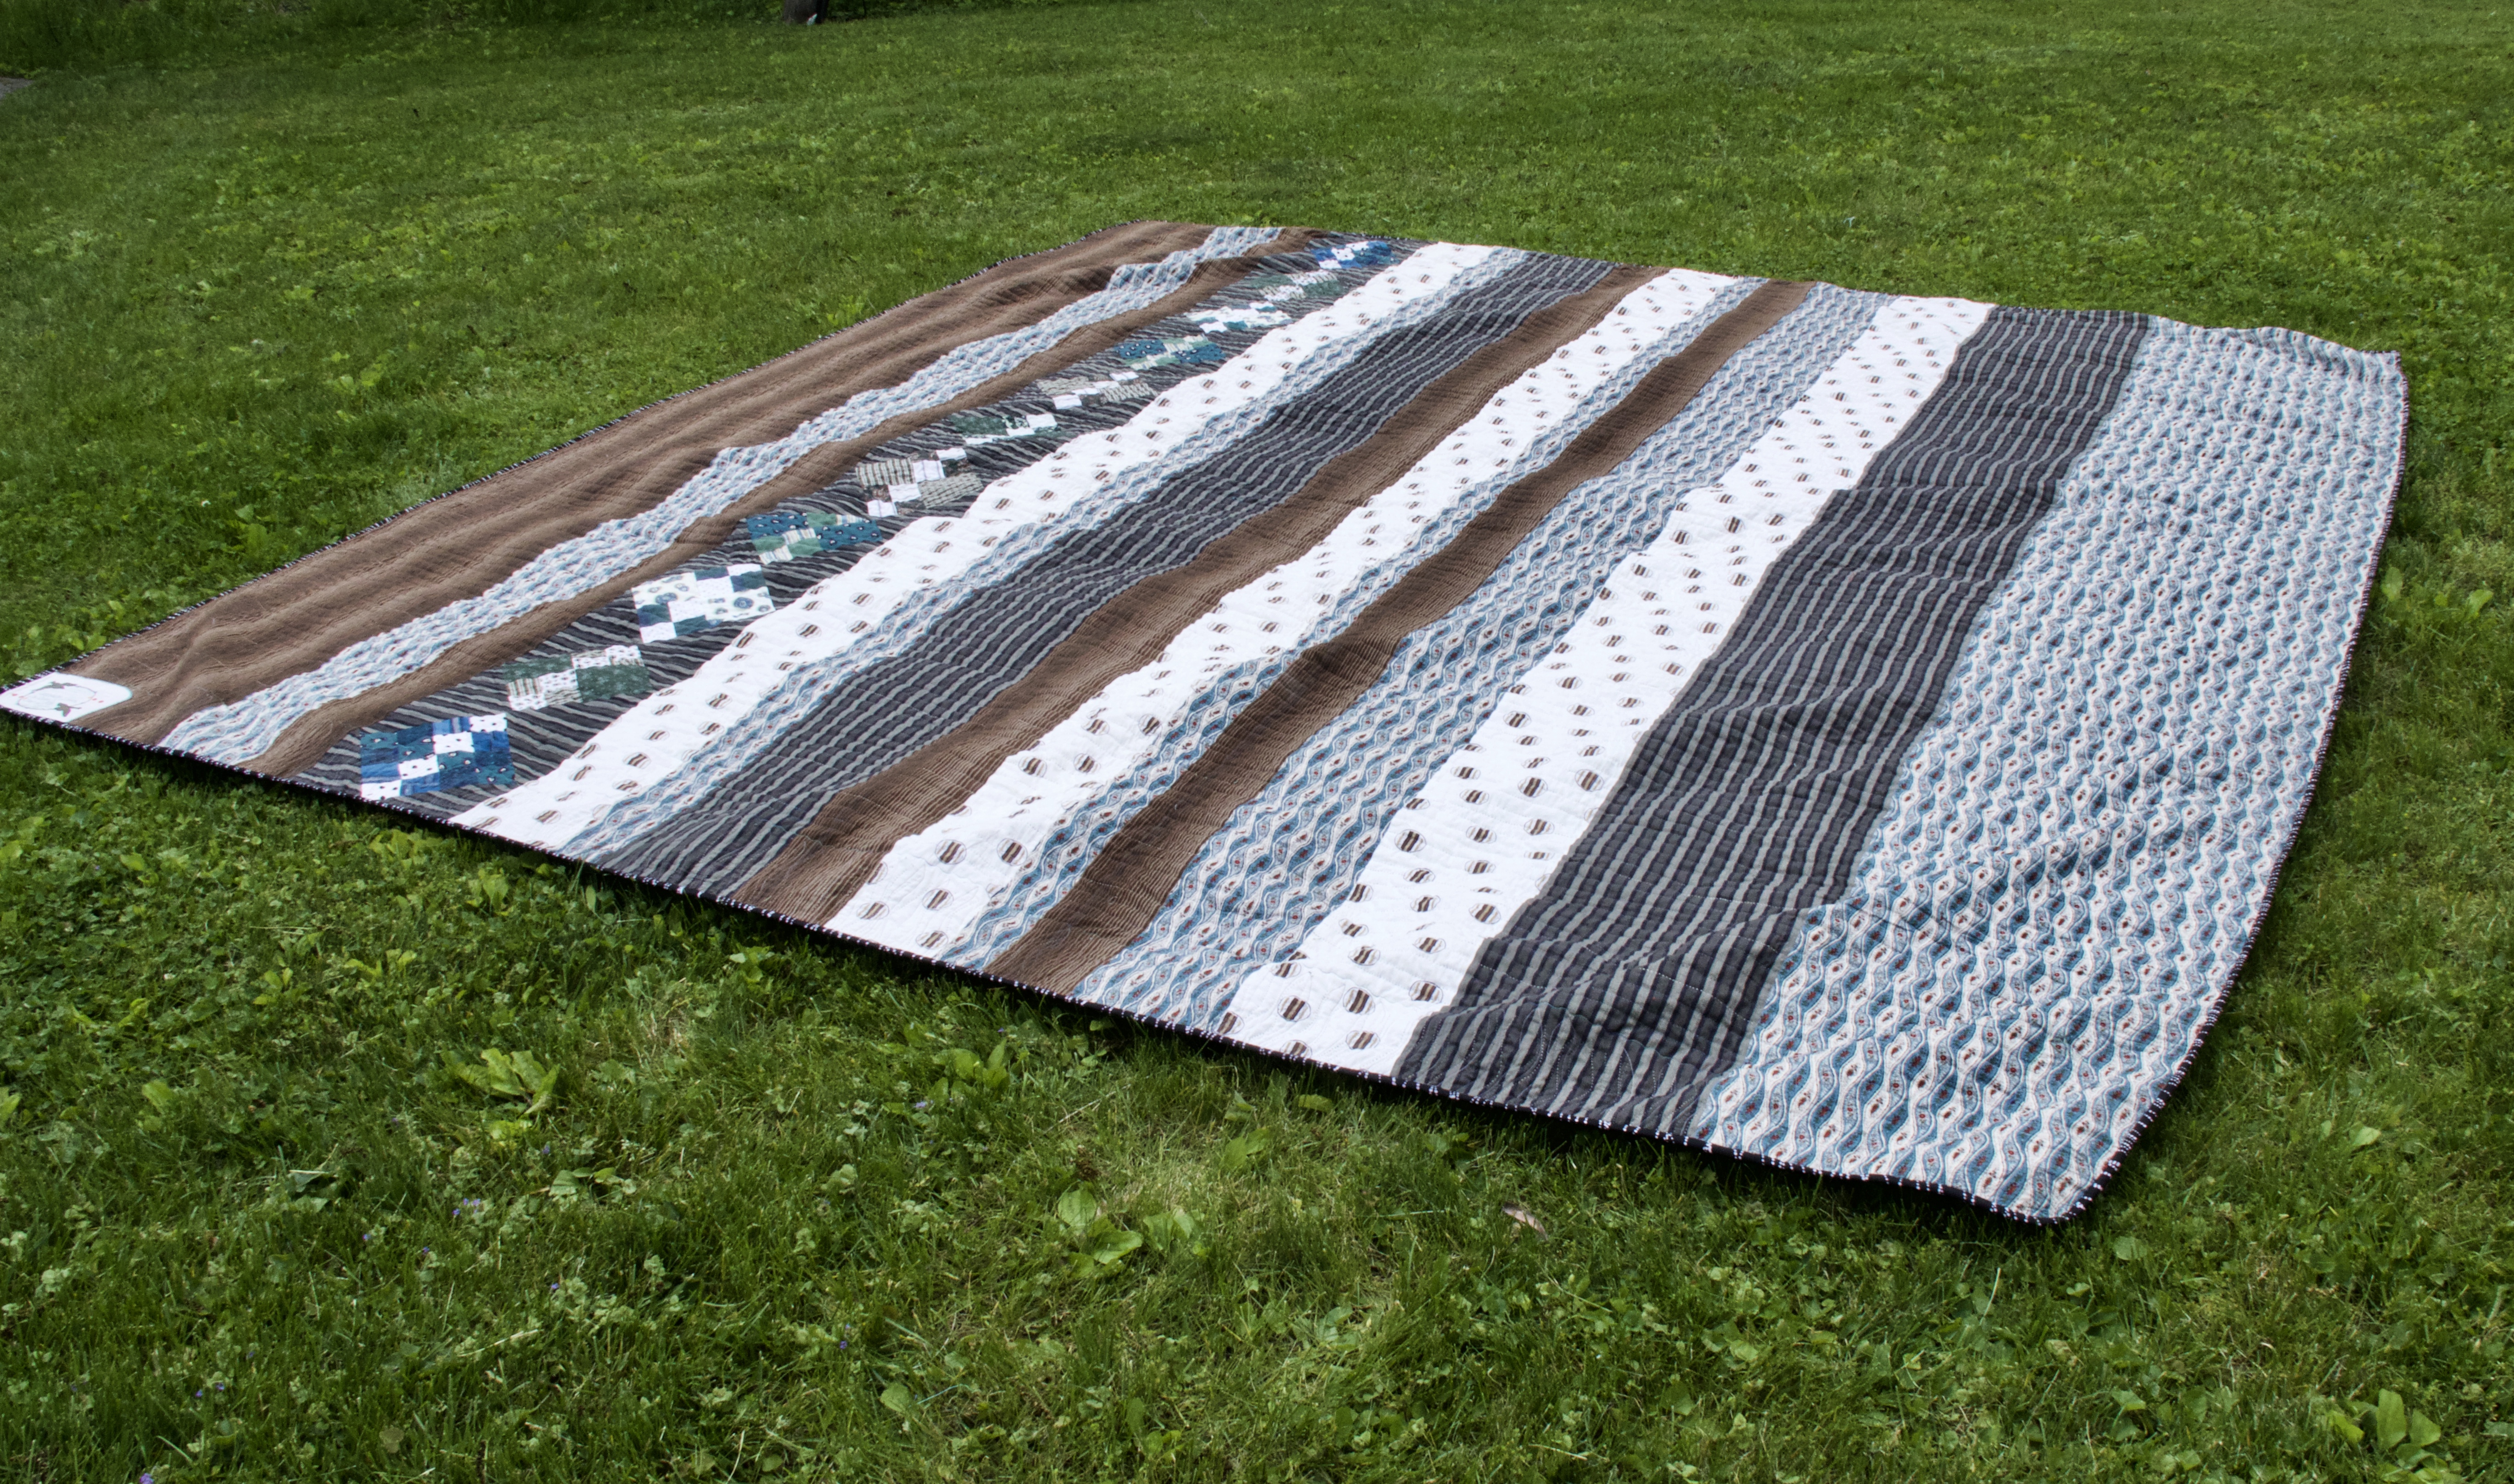
I was bound and determined that I was NOT going to the store to buy fabric for the back of the quilt. Piecing the back with fabric from my abundant stash would be the answer. I had some left-over blocks that I hadn’t used on the front of the quilt, so I made a strip of several of them, then auditioned long enough fabrics to frame the block-strip. As it was, though some of the fabrics were long enough, other fabrics were not, but to my eye, worked and I carefully pieced them and added them to the mix.


I used MOST of this roll of wool batting that I had ordered a year before. It, too, had to be pieced, which I did successfully on my more modern Brother sewing machine using a zig-zag stitch.

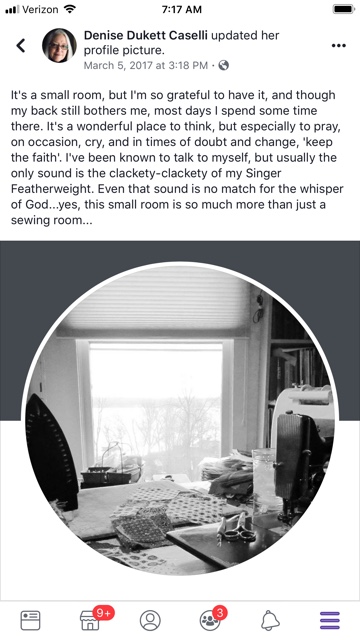
Then came the day when I had to baste the top and bottom of the quilt together. My sewing room, being as small as it is, made it necessary to move a collapsible utility table into our large bedroom. I pinned it with safety pins in strategic places to help keep it from shifting and beginning from the center, with red thread and a large needle, I began making the large stitches that would hold all the layers together for the quilting. As I write this blog, I recall my much younger days when Mom would send me to her sewing room for a needle to make some sort of repair. Biggest is best, right? That’s what I thought. So, of course, I would grab the biggest needle. Proud of my choice, Mom would laugh that I brought her, her words, “a ‘crowbar'”. I began basting the three layers together with what would be perfectly described as a crowbar. It did the job, too!

Once the quilt was relatively stable, I moved it downstairs and began quilting it. I wanted the quilt to have a more modern look, so opted for straight lines using mostly variegated quilt threads which I ordered online. I was happy with the Sulky 12 weight threads in beautiful colors of greens and blues, as well as solid colors of pearl cottons in blue, green, black, and white.


Nearly 6 rolls of blue painter’s tape helped me cross the wide expanse of the quilt. The width of the tape determined how far apart my quilting would be. It was so satisfying to rip off the tape after each traverse, wad it up into a ball, and then attempt to ‘make a basket’ into the wastebasket adjacent to my husband’s chair. I missed a lot, but he was happy to make the ‘assist’.

There were many days the quilt sat near the fire, instead of on my knees…it was our silent conversationalist many nights…

As more and more of the quilt was quilted, I removed the red basting thread. It was easy and made every small ‘inch by inch’ accomplishment even more rewarding.

As I got to the border, I pulled out some heavier threads that I had in my stash to use in quilting; one I particularly loved and a couple that, shall I say, were supporting actors, and randomly quilted with these three colors. On the last side of the border, the favorite was running dangerously low, but with only 5 inches of the thread, I was able to finish! If I hadn’t been quilting randomly, I might have been able to estimate how much I needed, but God supplied enough, through to the last stitch.
After the hand-quilting was finished on the border, I decided to push myself by adding some machine-quilting to the hand-quilting God had made possible to complete. Again, I used my Brother machine, which has a needle-down feature, making the process of rotating the quilt (especially of this size) a less wobbly affair. It’s not because I’m not great at machine quilting that I don’t have a photo of this process, I just forgot, but I was happy with the results. Again I used a beautiful variegated grey/white thread made by Sulky.


Not all the machine-quilting was pleasing to my eye, which meant the seam ripper had to come out. It slowed me down a little, but glad that I removed the stitching before I proceeded with any more machine-quilting.


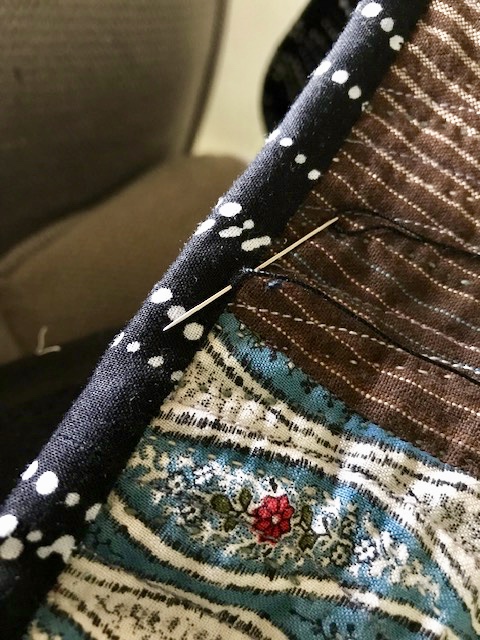
After all the ‘corrections‘ were made and the hand-quilting on the border was finished, I needed to make the binding. After taking stock of what fabric I had left after using the majority of it for the border, I was concerned that I wouldn’t have enough of the fabric, but took an ‘estimated’ chance. I cut the fabric in widths of 2.25 inches, but had to piece the strips several times as some pieces were only 6 inches in length! The binding pressed in half and ready to go, we set up the collapsible table one last time in our bedroom, and I, again with my beloved Featherweight, for old time’s sake began machine-stitching the binding to the quilt. It was a blessed time as I looked out over the lake, knowing, at one time, whenever Mom sewed in the little upstairs bedroom at her house in Saranac Lake, she had a lake view, too. I was blessed, too as I joined the two ends of the binding together with only 12 inches to spare. I cut it close, but again, God provided.


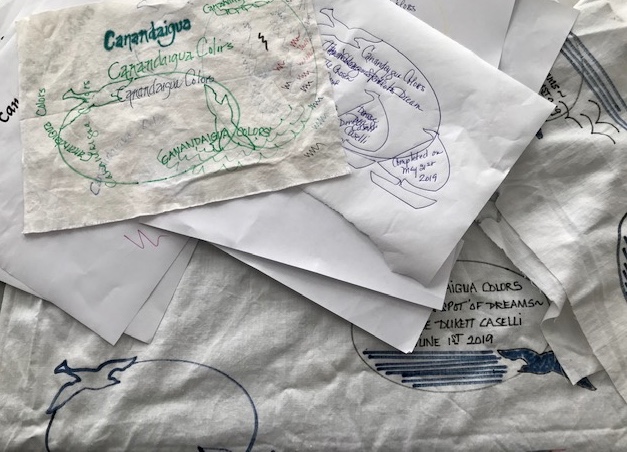
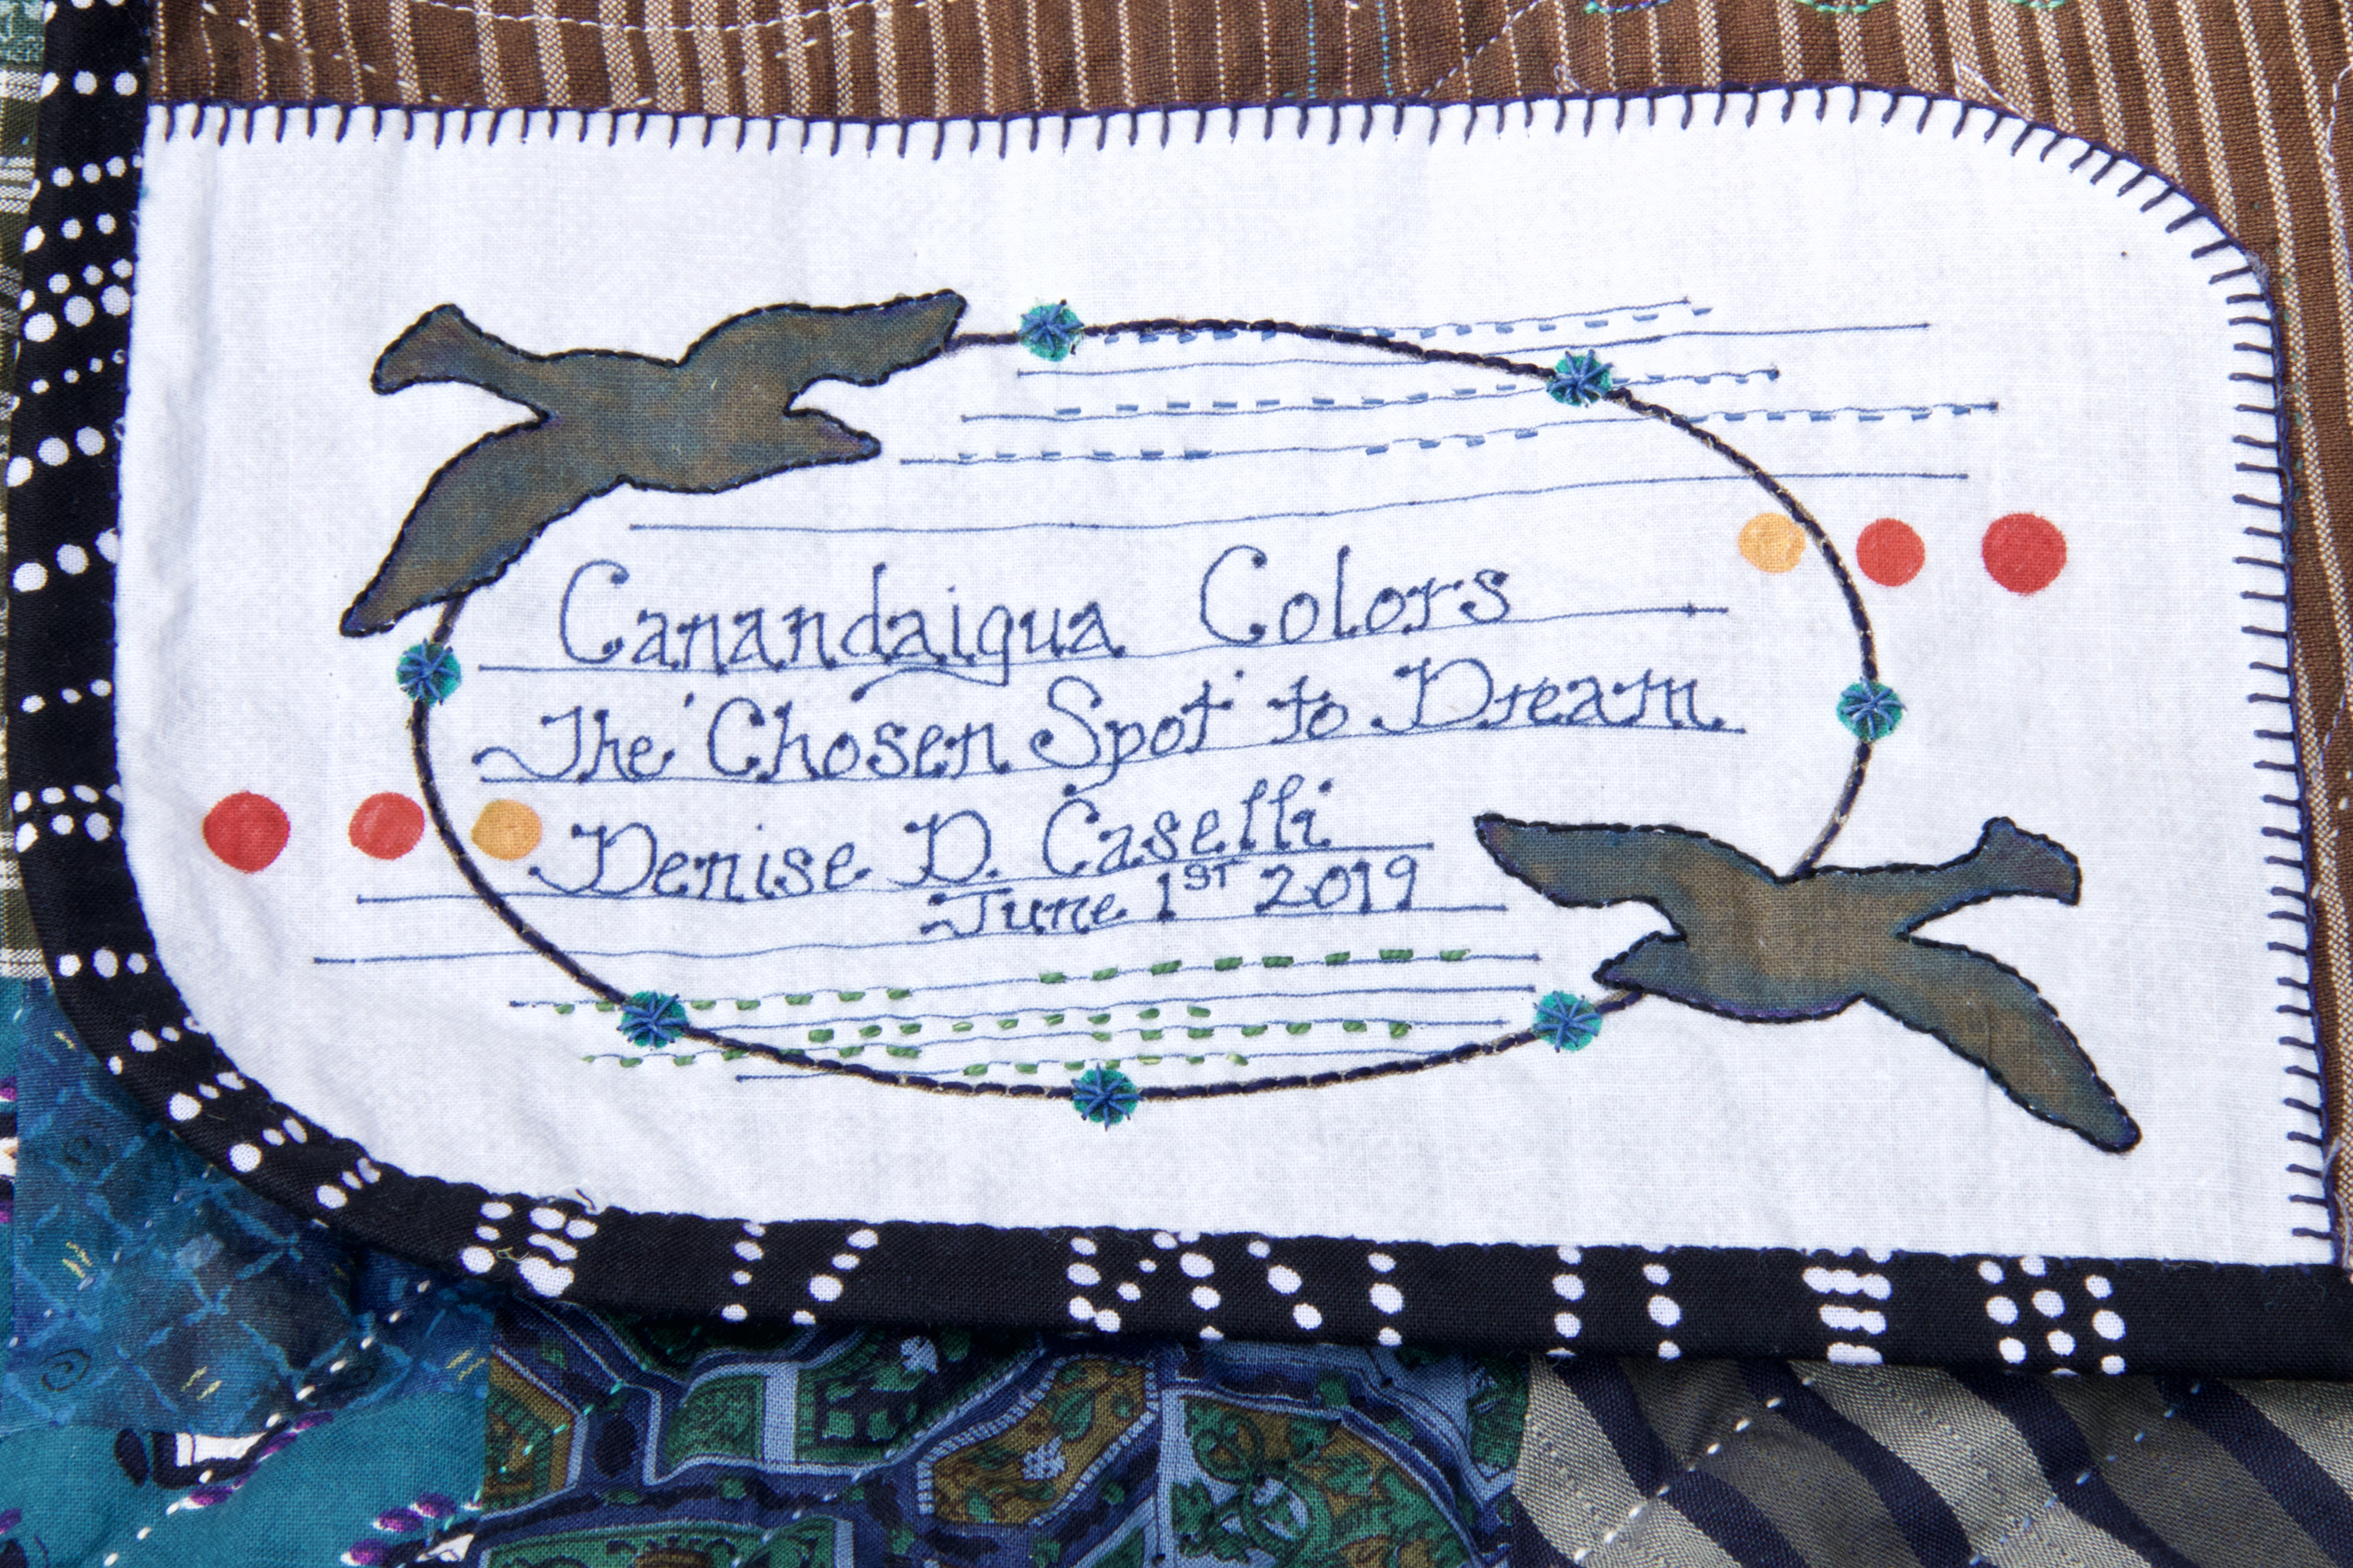
After the binding was attached to the quilt, I began the process of turning the folded edge of the binding to the back side of the quilt. I LOVE this last step, but, to document the quilt, I was in a quandary as to the ‘name’ of the quilt. The label took me many tries as the photo below attests to…
But, I finally finished it. I used some fabric markers and outlined some of the lines with thread and with a blanket or buttonhole stitch hand-sewed it into one corner of the quilt.
I now could finish the hand-stitching on the binding. Here is my last stitch securing the binding to the quilt…OH, HAPPY DAY!!!
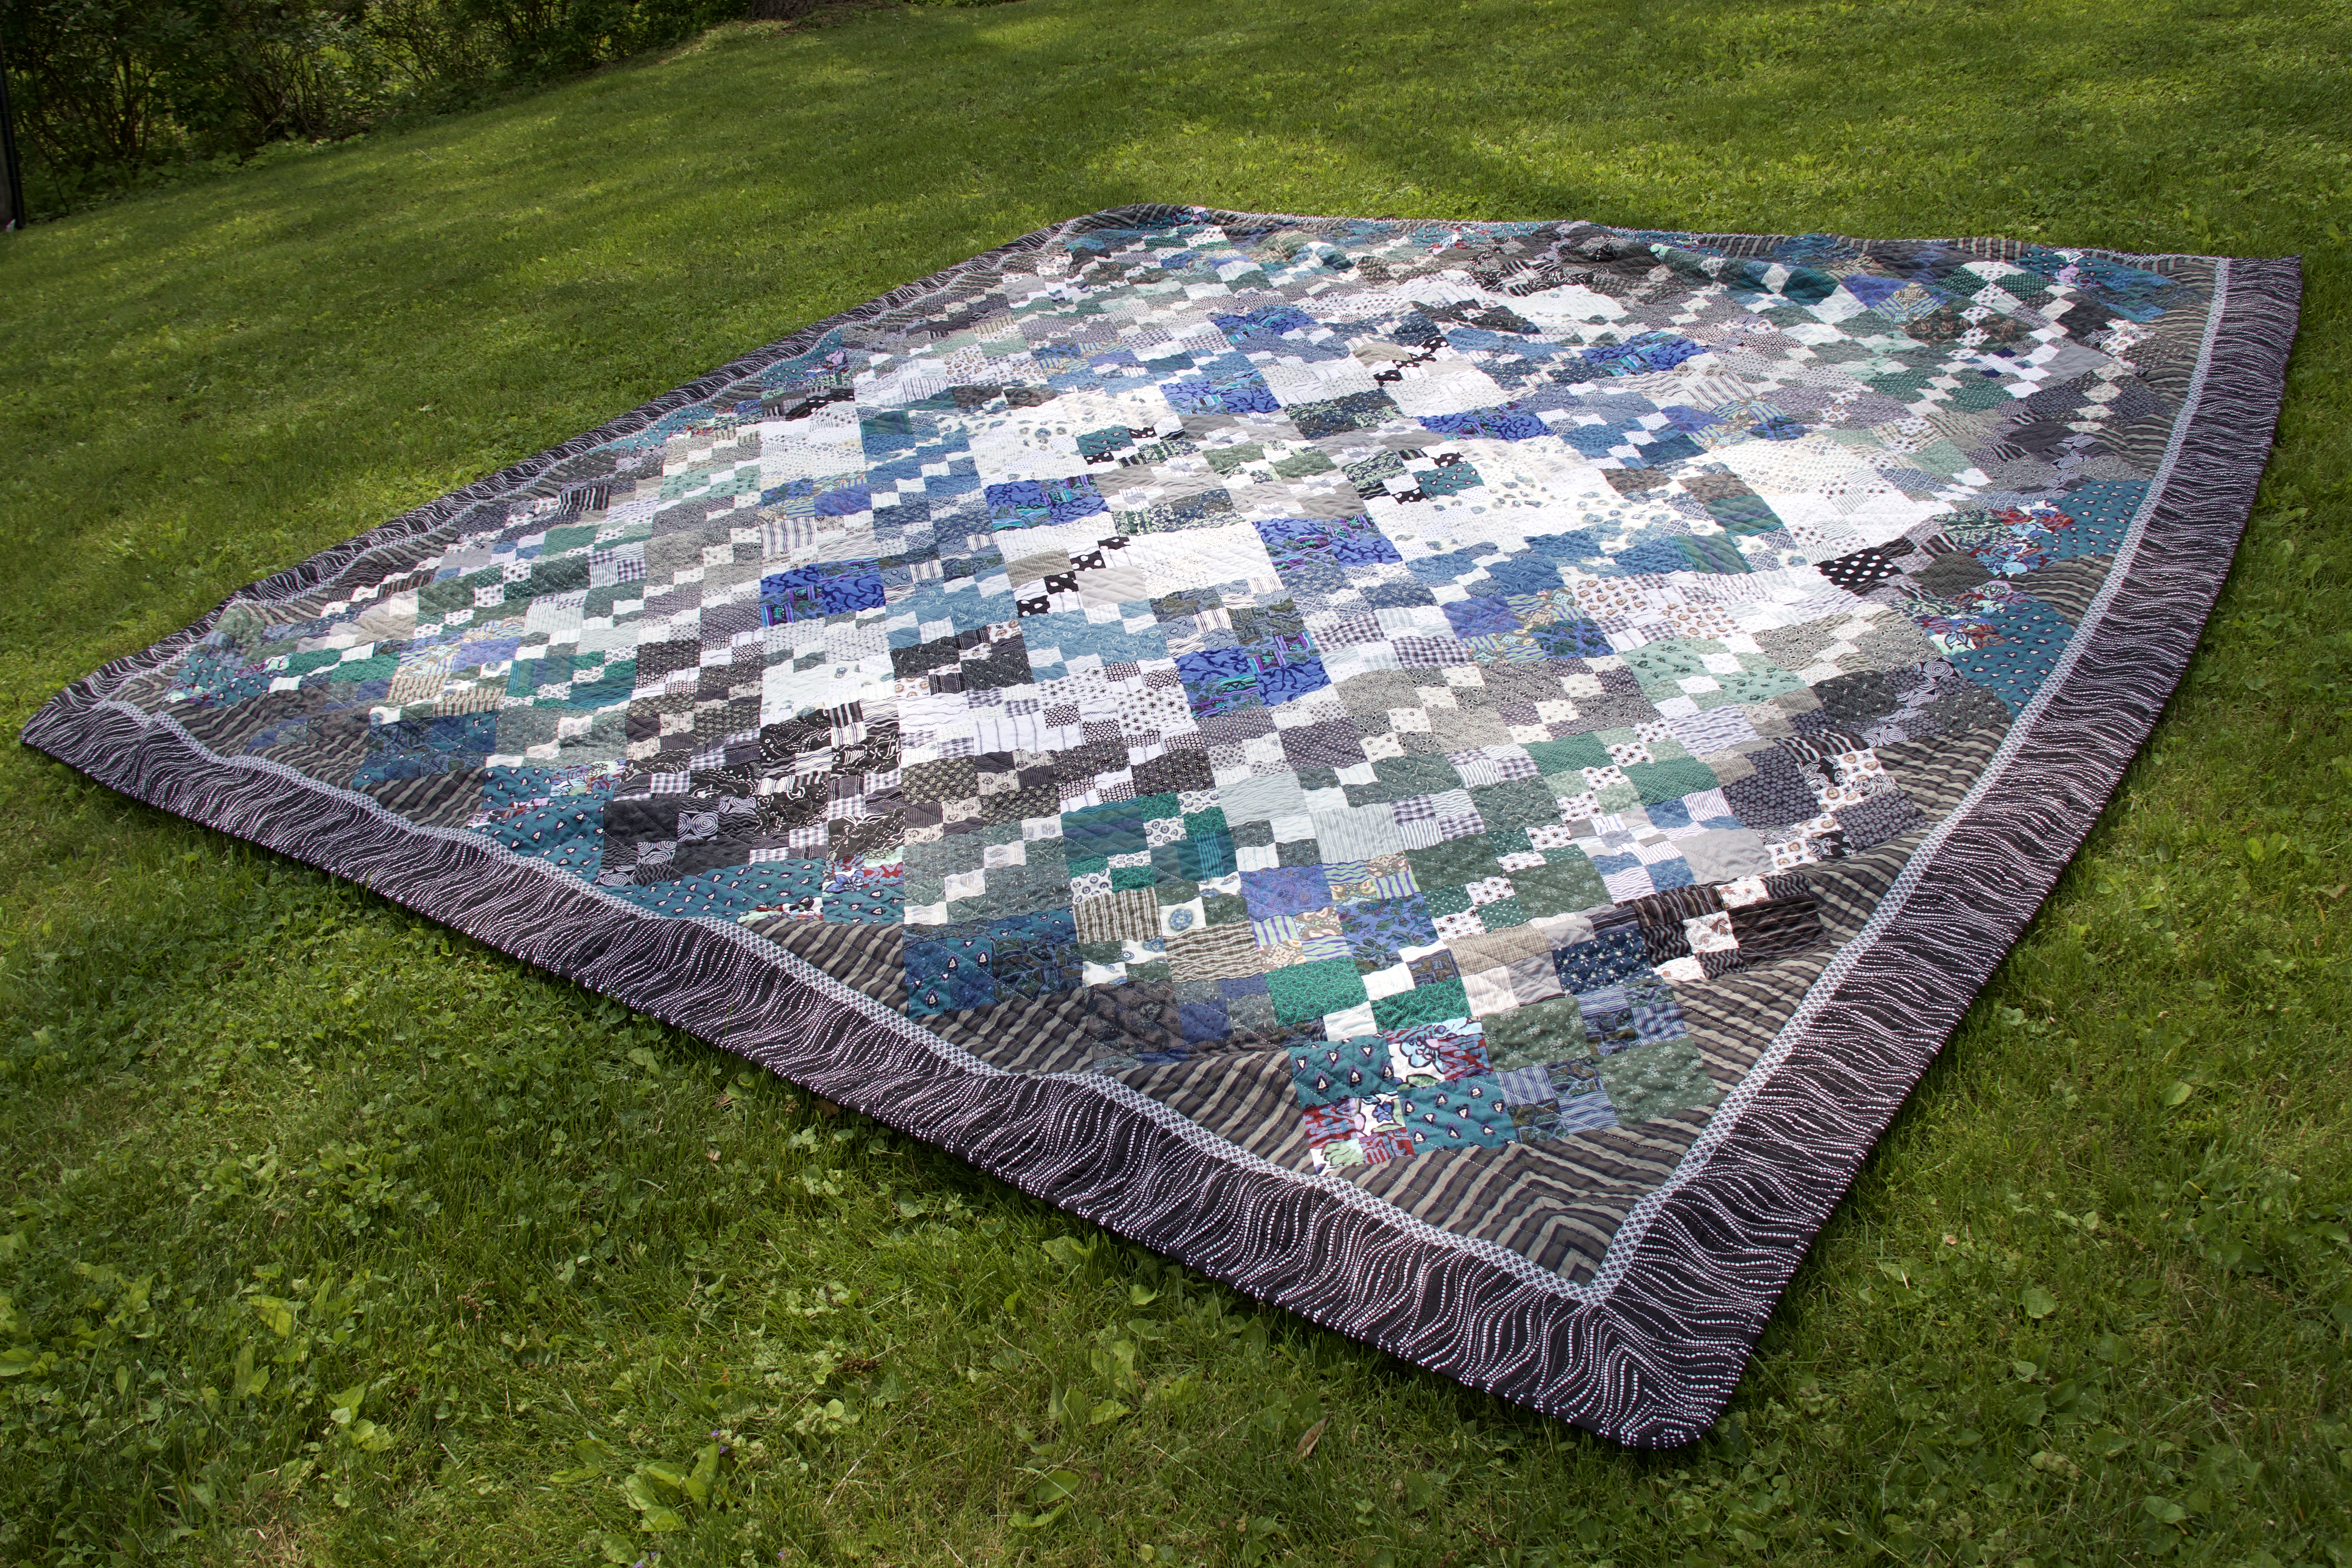
And here is the finished project…
The pieced back…
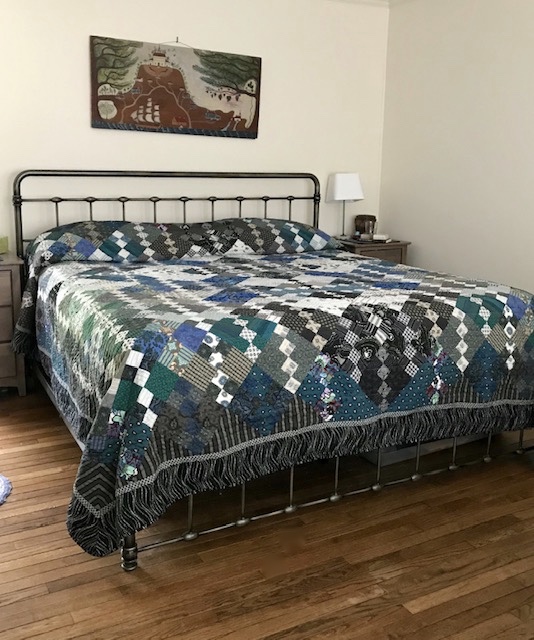
And, yes, on our bed…
And do you remember the name of the inspiration quilt, pulled from a magazine in the 1980s? “The End of The Trail”, now my ‘Chosen Spot to Dream’ in the restful shades of blues, grays, and greens, is known to me as, “Canandaigua Colors“.
We think it’s a Cooper’s Hawk.

 Proceed. I have to…to look at this photo of my little Canon Powershot, I know I am rich. Rich in the celebrations of success and, yes, the lessons ingrained in miserable failures. Rich, too, through the growing pains that patience asks of us and perseverance produces. I’m rich in the broadening of my still humanly-puny view of God and His creation, through the time spent photographing the small world around me, rich for accepting the challenges this little camera offered me, and rich knowing every lesson I’ve been taught, turned out to reward me in ways that I never, EVER could have imagined.
There are benefits to the methodical ways by which I proceed, but maybe that’s just the indication that I’m a slow learner. Whether I choose to be described as one or the other, I’ll need to take all that I’ve learned with me and remember those lessons in the weeks and months to come. Yes, I am more than slightly apprehensive about the new camera that arrived in the mail two days ago, (it took me a full day before I opened the box) but it’s here and my next milestone is waiting for me to step out in faith. Challenged by the words of Arthur Ashe, I will start where I am, use what I have, and do what I can.
It’s all that I can do, ever, but, thank the Lord, never alone. Jesus asks me to do these things empowered by His Name, which is a real game-changer, with life-altering and redemptive possibilities. Truth be known, my rebel heart is not a fan of change, (big surprise, there!) so please say a prayer for me because, YIKES, I’m fully aware that change is coming. But hopes are high that as a follower of Jesus Christ, His holy and eternal purposes will develop an image reflecting His glory that, at this writing, He sees infinitely more clearly than I see. I might become a better photographer, too.
